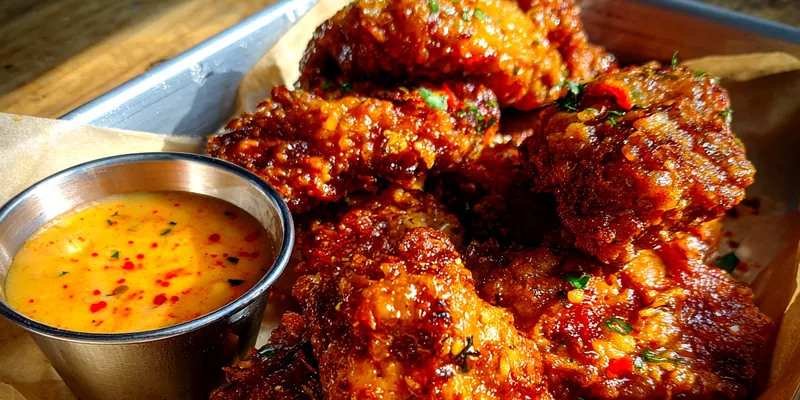
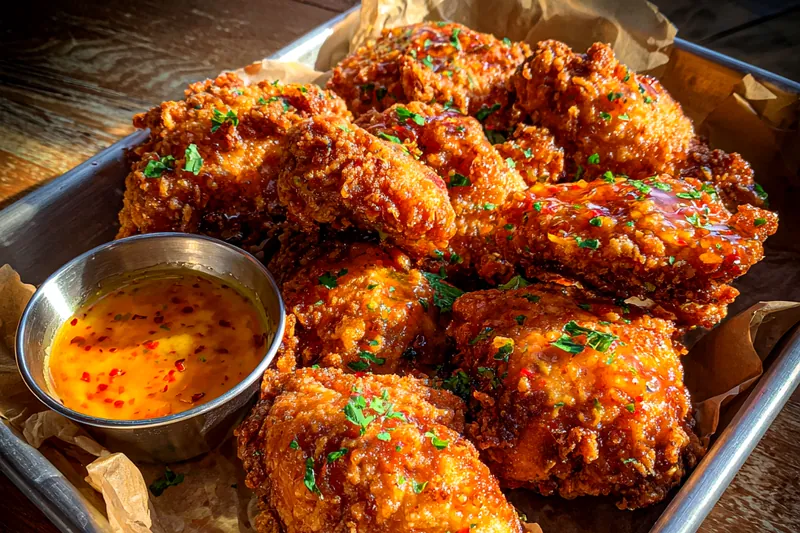
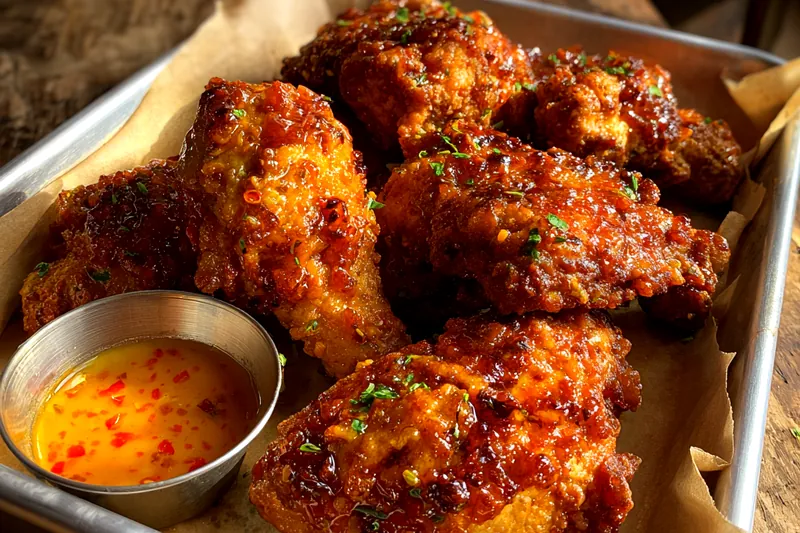
Crispy Glazed Chicken Strips
Crispy Glazed Chicken Strips are a perfect fusion of texture and flavor. With a crunchy exterior and a sweet glaze, they make a wonderful dinner option. Whether you're hosting a gathering or craving a quick meal, these chicken strips are sure to please everyone. Pair them with your favorite sides for a complete dining experience!

Why This Crispy Glazed Chicken Strips Recipe Works
This recipe stands out due to its unique combination of crispy texture and sweet glaze. The panko breadcrumbs create a light and crunchy coating, while the glaze adds a burst of flavor. These chicken strips are perfect for any occasion, from weeknight dinners to game day snacks.
The technique of double-coating the chicken ensures a satisfying crunch with every bite. Frying in hot oil locks in moisture, making the chicken juicy and tender inside. This method results in chicken strips that are not only crispy but also flavorful, making them irresistible.
💡 Professional Tip
For the ultimate crispy texture, make sure your oil is at the right temperature before frying. Use a thermometer to check that the oil reaches 350°F. This prevents the chicken from absorbing excess oil, ensuring a light and crispy exterior.
Frequently Asked Questions
Yes, you can prepare the chicken strips in advance. After frying, let them cool and store them in an airtight container in the fridge for up to 2 days. Reheat them in the oven for a few minutes to regain their crispiness before serving.
If you don't have buttermilk, you can make a substitute by mixing 1 cup of milk with 1 tablespoon of lemon juice or vinegar. Let it sit for about 5 minutes to curdle before using it in the recipe.
The chicken strips should be golden brown and reach an internal temperature of 165°F when fully cooked. You can use a meat thermometer to check the temperature to ensure they are safe to eat.
Yes, you can freeze the cooked chicken strips. Place them in a single layer on a baking sheet, freeze until solid, then transfer to a freezer bag. They can be frozen for up to 3 months. Reheat directly from frozen to enjoy later.
These chicken strips pair well with a variety of sides, including coleslaw, fries, or a fresh salad. For a complete meal, consider serving them with rice or a dipping sauce like ranch or honey mustard.
Crispy Glazed Chicken Strips can last in the fridge for up to 3 days when stored in an airtight container. Make sure they are cooled completely before refrigerating to maintain their texture.
Absolutely! You can prepare the chicken strips and glaze beforehand. Just store them separately in the fridge. When ready to serve, reheat the strips in the oven and toss them in the glaze for a quick meal.
To reheat, place the chicken strips on a baking sheet and warm them in a preheated oven at 350°F for about 10-15 minutes. This helps to restore their crispiness. Avoid microwaving, as it can make them soggy.
Recipe Troubleshooting Guide
Too Dry
Problem: The chicken strips turned out dry and tough.
Solution: Ensure not to overcook the chicken. Use a meat thermometer to check for doneness at 165°F. Marinating the chicken in buttermilk beforehand can also help keep it moist.
Not Crispy Enough
Problem: The chicken strips lack the desired crunch.
Solution: Double coat the chicken strips in flour and panko breadcrumbs for added crunch. Make sure the oil is hot enough before frying to achieve optimal crispiness.
Overcooked
Problem: The strips were burnt on the outside but raw inside.
Prevention: Fry the chicken strips in smaller batches to maintain oil temperature. Use medium heat and adjust as necessary to avoid burning the exterior while ensuring the inside is cooked through.
Undercooked Center
Problem: The chicken is cooked on the outside but raw inside.
Recovery: If you suspect undercooking, continue frying the strips in batches until they reach the correct internal temperature. You can also finish cooking them in the oven if needed.
Burnt Exterior
Problem: The coating has burned while frying.
Prevention: Adjust the frying temperature and avoid overcrowding the pan. Monitor the frying closely to prevent burning the coating.
Flavor Balance
Too Sweet: If the glaze is too sweet, add a splash of soy sauce or vinegar to balance the flavors.
Too Salty: For an overly salty glaze, dilute it with a bit of honey or sugar to balance the taste.
Bland: If the flavor is bland, enhance it with more spices or seasoning to boost the overall taste.
Essential Ingredients for Crispy Glazed Chicken Strips
The chicken is the star of this dish, so choose high-quality, fresh chicken breast for the best results. The coating consists of flour and panko breadcrumbs, ensuring each bite is crunchy. The glaze, made of butter, honey, and soy sauce, offers a perfect blend of sweetness and umami.
Using fresh ingredients is crucial for flavor. Opt for real butter over margarine for a richer taste. Additionally, using high-quality honey will enhance the glaze's sweetness while providing a unique flavor profile. Fresh spices will also amplify the overall taste of the dish.
Essential Ingredient Notes
- Chicken Breast: Choose well-trimmed chicken breast to avoid excess fat. If possible, buy organic chicken to ensure the best flavor and quality for your dish. The cut should be uniform for even cooking.
- Panko Breadcrumbs: Panko breadcrumbs are lighter and crispier than regular breadcrumbs. They create an amazing crunch that elevates the dish. Store them in a cool, dry place to maintain their texture.
- Honey: Select pure honey rather than processed versions for a natural flavor. Honey not only adds sweetness but also a beautiful glaze when combined with butter. It can also be adjusted to suit your taste preferences.
Step-by-Step Cooking Process
The cooking process for these chicken strips is straightforward. You start by preparing the chicken and coating it with flour, buttermilk, and panko breadcrumbs. The frying method locks in moisture and ensures a crispy exterior.
Attention to temperature is key to achieving perfect results. Keeping the oil at a steady temperature will prevent the chicken from becoming greasy. Once fried, a quick toss in the glaze amplifies the flavors and provides a delicious finish.
Key Technique for Perfect Crispy Glazed Chicken Strips
The double-coating technique is crucial for achieving the desired crunch. By first dipping the chicken in buttermilk and then coating it with the flour mixture and panko, you create layers that fry up beautifully. Maintaining the right oil temperature during frying is also essential for a crispy, golden result.
Crispy Glazed Chicken Strips
📋 Ingredients
Main Ingredients
- 1 cup butterRoom temperature
- 1/2 cup honeyPure honey
- 1/4 cup soy sauceLow sodium recommended
- 1 tablespoon apple cider vinegarFor tanginess
- 1 teaspoon sesame oilFor flavor
- 1/4 teaspoon red pepper flakesFor a kick
For the Sauce
- 2 lbs chicken breastCut into strips
- 1 cup all-purpose flourFor coating
- 1 teaspoon paprikaFor flavor
- 1 teaspoon garlic powderFor flavor
- 1 teaspoon onion powderFor flavor
- 1/2 teaspoon saltTo taste
- 1/4 teaspoon black pepperTo taste
- 1 cup buttermilkFor moisture
- 2 cups panko breadcrumbsFor crunch
Instructions
Prepare Ingredients
Gather all ingredients and cut the chicken breast into strips. Set aside.
Mix Dry Ingredients
In a bowl, combine flour, paprika, garlic powder, onion powder, salt, and pepper.
Prepare Buttermilk Mixture
Pour buttermilk into a separate bowl.
Coat Chicken Strips
Dip each chicken strip first into the buttermilk, then into the flour mixture, and finally into the panko breadcrumbs.
Fry Chicken Strips
Heat oil in a deep frying pan over medium heat. Fry the chicken strips until golden brown, about 6-8 minutes.
Prepare Sauce
In a saucepan, melt butter and stir in honey, soy sauce, apple cider vinegar, sesame oil, and red pepper flakes. Simmer for 5 minutes.
Glaze Chicken Strips
Once cooked, toss the fried chicken strips in the glaze until well coated.
Serve
Plate the glazed chicken strips and serve immediately.
Recipe Notes & Tips
Storage Tips
Store any leftover chicken strips in an airtight container in the fridge. To maintain their texture, let them cool completely before sealing. They can be kept for up to 3 days.
Serving Suggestions
Serve the Crispy Glazed Chicken Strips with a side of coleslaw or fries for a complete meal. Pairing them with dipping sauces like ranch or honey mustard enhances the experience.
Recipe Variations
Feel free to experiment by adding spices to the coating or trying different glazes, such as teriyaki or barbecue. You can also substitute chicken with tofu for a vegetarian option.