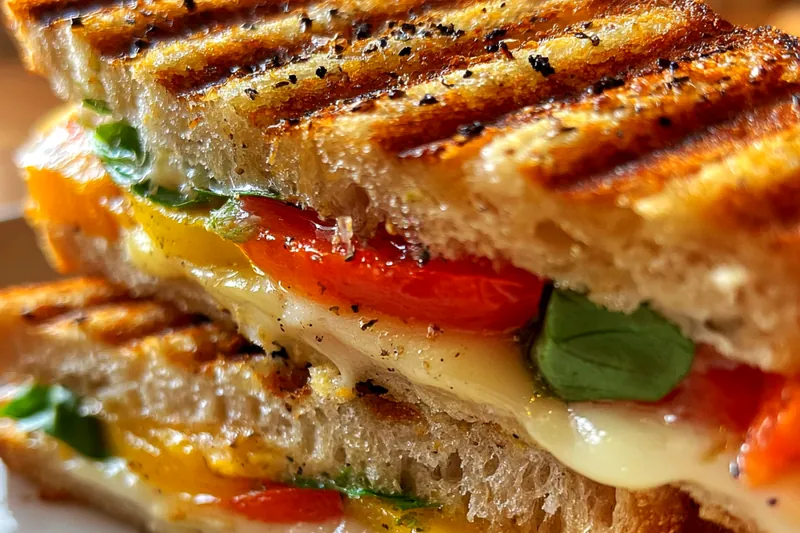
Peach Cheddar Grilled Sandwich
The Peach Cheddar Grilled Sandwich is a gourmet twist on the classic grilled cheese. Combining the sweetness of ripe peaches with the sharpness of cheddar cheese creates a delightful flavor contrast. Perfect for lunch or a light dinner, this sandwich is quick to prepare and sure to impress. Enjoy it warm, with a hint of honey and fresh herbs for a truly delicious experience.


Why This Peach Cheddar Grilled Sandwich Recipe Works
This recipe stands out due to the harmonious blend of flavors and textures. The sweetness of ripe peaches balances perfectly with the sharpness of cheddar, creating a uniquely satisfying bite. The use of whole-grain bread adds a wholesome touch while providing a crunchy texture.
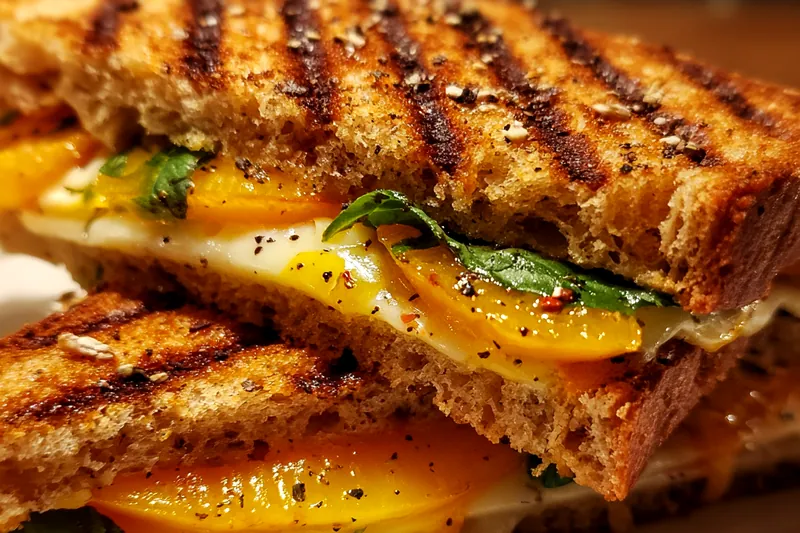
Grilling the sandwich to golden perfection allows the cheese to melt beautifully while the peaches warm up, enhancing their natural sweetness. The addition of basil and walnuts introduces freshness and crunch, making each bite an unforgettable experience.
💡 Professional Tip
For the best results, use ripe, but not overly soft peaches. The right ripeness will enhance sweetness while still holding their shape during grilling. Also, don’t rush the grilling process; cook on medium heat to ensure even melting of the cheese.
Frequently Asked Questions
Yes, you can prepare the sandwiches ahead of time. Assemble the sandwiches and wrap them tightly in plastic wrap or foil to keep them fresh. Refrigerate for up to 24 hours. When ready to eat, grill them fresh for the best texture.
If peaches are out of season, nectarines or even pears can be great substitutes. They offer similar sweetness and texture, allowing you to maintain the essence of the sandwich while using different fruits.
The sandwich is done when both sides are golden brown and crispy, and the cheese is thoroughly melted. You can also check the internal temperature; it should be around 165°F (74°C) for a safe serving.
While it's possible to freeze the sandwich, it’s best to freeze them before grilling. Wrap the assembled sandwiches tightly in foil or plastic wrap, then place them in a freezer-safe bag. When ready to eat, thaw and grill to your desired crispiness.
Pair the sandwich with a light salad, such as arugula or spinach, tossed with a simple vinaigrette. A side of sweet potato fries or fresh fruit complements the flavors wonderfully, creating a well-rounded meal.
The sandwich is best enjoyed fresh, but it can be stored in the fridge for up to 2 days. Reheat in a skillet to restore its crispiness before serving.
Yes, you can make the sandwich in advance and grill it just before serving. Prepare and assemble the sandwich, then refrigerate it. When ready to serve, grill it for a few minutes on each side.
To reheat, place the sandwich in a skillet over medium heat. Cover with a lid to help melt the cheese while getting the bread crispy. Avoid microwaving, as it can make the bread soggy.
Recipe Troubleshooting Guide
Too Dry
Problem: The sandwich may turn out dry if the bread is stale or if too much filling is omitted.
Solution: Make sure to use fresh bread and don’t skimp on the cheese and peach filling. Adding a bit more butter when grilling can also help maintain moisture.
Not Crispy Enough
Problem: If the sandwich isn’t crispy, it might be due to insufficient heat or too little butter.
Solution: Increase the heat slightly and ensure that both sides are evenly buttered before grilling. Use a heavy skillet to apply more pressure while cooking.
Overcooked
Problem: The sandwich may burn or become too crispy on the outside while remaining cold inside.
Prevention: Lower the heat and cook slowly to allow cheese to melt thoroughly without burning the bread.
Undercooked Center
Problem: Sometimes the bread can appear golden while the cheese hasn’t melted properly.
Recovery: Cover the skillet while cooking to trap heat and help the cheese melt evenly. You can also flip the sandwich more frequently to evenly cook it.
Burnt Exterior
Problem: The outer part of the sandwich may burn before the inside is cooked.
Prevention: Use a lower flame and cover it while cooking, ensuring a thorough cooking process without burning.
Flavor Balance
Too Sweet: If the sandwich is too sweet, add a touch of salt to balance out the flavors.
Too Salty: If it's too salty, serve it with fresh fruit slices to counter the saltiness.
Bland: For bland sandwiches, consider adding a dash of hot sauce or more herbs to enhance the flavor.
Essential Ingredients for Peach Cheddar Grilled Sandwich
The key to this delicious sandwich lies in its ingredients. Ripe peaches add natural sweetness while sharp cheddar cheese provides a creamy, savory flavor. Whole-grain bread not only adds nutrition but also a satisfying crunch when grilled.
Quality ingredients are paramount. Choose fresh, ripe peaches that are fragrant and slightly soft, as they will enhance the overall flavor. Opt for a good quality cheddar that melts well, ensuring a creamy texture throughout the sandwich.
Essential Ingredient Notes
- Peaches: Use ripe but firm peaches for the best texture and flavor. They should be sweet, juicy, and slightly fragrant. Avoid overripe ones as they can become mushy while grilling.
- Cheddar Cheese: Opt for sharp cheddar cheese for a more robust flavor. It melts beautifully and complements the sweetness of the peaches, creating an irresistible combination.
- Whole-Grain Bread: Choose whole-grain bread for added nutrition and texture. Look for a bread that is fresh and sturdy enough to hold up to grilling without falling apart.
Step-by-Step Cooking Process
Making the Peach Cheddar Grilled Sandwich is a straightforward process that allows for creativity. Start by preparing your ingredients and assembling your sandwich, ensuring a proper balance of flavors.
Grilling the sandwich to golden perfection takes patience. Monitor the heat closely and flip the sandwich as needed to achieve an evenly cooked, crispy exterior without burning.
Key Technique for Perfect Peach Cheddar Grilled Sandwich
The most important technique is to grill the sandwich over medium heat. This allows the cheese to melt without burning the bread. Using a skillet with a lid can help trap heat, ensuring even cooking.
Peach Cheddar Grilled Sandwich
📋 Ingredients
Main Ingredients
- 1 cup honeyFor drizzling
- 1/4 cup fresh basilChopped
- 1 tbsp cinnamonFor flavor
- 1/2 tsp saltTo taste
For the Sauce
- 1 lb ripe peachesSliced
- 8 slices of cheddar cheeseSharp
- 12 slices of whole-grain breadFor the base
- 4 tbsp butterSoftened
- 1 tsp cinnamonFor flavor
- 1/4 cup walnutsChopped, optional
- 1 tbsp lemon juiceTo enhance flavor
- Pepper to tasteFor seasoning
Instructions
Prepare the Ingredients
Slice the peaches and cheese. In a small bowl, mix honey, cinnamon, salt, and lemon juice to create a glaze for the peaches.
Assemble the Sandwich
On a slice of bread, layer cheese, peach slices, chopped basil, and walnuts. Drizzle some honey glaze over the top before adding another slice of cheese and a second slice of bread.
Butter the Bread
Spread softened butter on the outer sides of the sandwich to ensure a golden crust while grilling.
Preheat the Grill
Heat a skillet or griddle over medium heat. Add a splash of olive oil to the pan.
Grill the Sandwich
Place the sandwich on the hot skillet. Cook for about 3-4 minutes per side, or until golden brown and the cheese has melted.
Serve Warm
Once cooked, remove the sandwich from the skillet and let it cool slightly before slicing in half.
Garnish and Enjoy
Serve the sandwich with a side of arugula and drizzle any remaining honey glaze on top.
Optional Additions
Feel free to customize your sandwich by adding more herbs or a spread of your choice.
Recipe Notes & Tips
Storage Tips
Store leftover sandwiches in an airtight container in the fridge for up to 2 days. To maintain their crispiness, reheat them in a skillet instead of the microwave.
Serving Suggestions
Serve with a side salad or fresh fruit for a light lunch. A drizzle of balsamic glaze over the salad can complement the flavors of the sandwich perfectly.
Recipe Variations
Feel free to experiment with different cheeses like gouda or brie. You can also try adding sliced prosciutto or turkey for a heartier sandwich.